User Tools
Table of Contents
Hellbender
Request an Account: You can request an account for access to Hellbender by filling out the form found at: Hellbender Account Request Form
What is Hellbender?
Hellbender is the latest High Performance Computing (HPC) resource available to researchers and students (with sponsorship by a PI) within the UM-System.
Hellbender consists of 263 mixed x86-64 CPU nodes providing 24844 cores as well as 41 GPU nodes with a total of 132 GPUs consisting of Nvidia GPU's including Volta, Ampere, and Hopper generations, with more details at https://docs.itrss.umsystem.edu/pub/hpc/hellbender#hardware. Hellbender is attached to our Research Data Ecosystem ('RDE') that consists of 8PB of high performance and general purpose research storage. RDE can be accessible from other devices outside of Hellbender to create a single research data location across different computational environments.
Investment Model
Overview
The newest High Performance Computing (HPC) resource, Hellbender, has been provided through partnership with the Division of Research Innovation and Impact (DRII) and is intended to work in conjunction with DRII policies and priorities. This outline will provide definitions about how fairshare, general access, priority access, and researcher contributions will be handled for Hellbender. HPC has been identified as a continually growing need for researchers, as such DRII has invested in Hellbender to be an institutional resource. This investment is intended to increase ease of access to these resources, provide cutting edge technology, and grow the pool of resources available.
Fairshare
To understand how general access and priority access differs, fairshare must first be defined. Fairshare is an algorithm that is used by the scheduler to assign priority to jobs from users in a way that gives every user a fair chance at the resources available. This algorithm has several metrics to perform this calculation over for any given job waiting in the queue, such as job size, wait time, current and recent usage, and individual user priority levels. This allows administrators to tune the fairshare algorithm, to adjust how it determines which jobs are next to run once resources are available.
Resources Available to Everyone: General Access
General access will be open to any research or teaching faculty, staff, and students for any UM system campus. General access is defined as open access to all resources available to users of the cluster at an equal fairshare value. This means that all users will have the same level of access to the general resource. Research users of the general access portion of the cluster will be given the RDE Standard Allocation to operate from. Larger storage allocations can be attained via investment, and independent of HPC priority status.
Resource Management
Information Technology Research Support Solutions (ITRSS) will procure, set up, and maintain the resource. ITRSS will work in conjunction with MU Division of Information Technology and Facility Services to provide adequate infrastructure for the resource.
Resource Growth
Priority access resources will generally be made available from existing hardware in the general access pool and the funds will be retained for a future time to allow a larger pool of funds to accumulate for expansion of the resource. This will allow the greatest return on investment over time. If the general availability resources are less than 50% of the overall resource, an expansion cycle will be initiated to ensure all users will still have access to a significant amount of resources. If a researcher or research group is contributing a large amount of funding, it may trigger an expansion cycle if that is determined to be advantageous at the time of the contribution.
Hellbender Advanced: Priority Access - Investment
When researcher needs are not being met at the general access level, researchers may request an advanced allocation on Hellbender to gain priority access via investment. Priority access will give research groups a limited set of resources that will be available to them without competition from general access users. Priority Access will be provided to a specific set of hardware through a priority partition which contains these resources. This partition will be created, and limited to use by the user and their associated group. These resources will also be in an overlapping pool of resources available to general access users. This pool will be administered such that if a priority access user submits jobs to their priority access partition, any jobs running on those resources from the overlapping partition will be requeued and begin execution again on another resource in that partition if available, or return to wait in the queue for resources. Priority access users will retain general access status, fairshare will still play a part in moderating their access to the general resource. Fairshare inside a priority partition determine which user’s jobs are selected for execution next inside this partition. The jobs running inside this priority partition will also affect a user’s fairshare calculations even for resources in the general access partition. Meaning that running a large amount of jobs inside a priority partition will lower a user’s priority for the general resources as well.
Benefits of Investing
The primary benefit of investing is receiving “shares” and a priority access partition for you or your research group. Shares are used to calculate the percentage of the cluster owned by an investor. As long as an investor has used less than they own, investors will be able to use their shares to get higher priorities in the general queue. than they own. FairShare is by far the largest factor in queue placement and wait times.
Investors will be granted Slurm accounts to use in order to charge their investment (FairShare). These accounts can contain the same members of a POSIX group (storage group) or any other set of users at the request of the investor.
To use an investor account in an sbatch script, use:
#SBATCH --account=<investor account>
#SBATCH --partition=<investor partition> (for cpu jobs)
#SBATCH --partition=<investor partition>-gpu --gres=gpu:A100:1 (requests 1 A100 gpu for gpu jobs)
To use a QOS in an sbatch script, use:
#SBATCH --qos=<qos>
How Much Does Investing Cost?
See our rates for FY 2025-2026:
| Service | Rate | Unit | Support |
|---|---|---|---|
| Hellbender CPU Node | $2,702.00 | Per Node/Year | Year to Year |
| Hellbender A100 GPU Node* | $7,691.38 | Per Node/Year | Year to Year |
| Hellbender L40s GPU Node* | $4,785.00 | Per Node/Year | Year to Year |
| Hellbender H100 GPU Node* | $13,123.00 | Per Node/Year | Year to Year |
| RDE Storage: High Performance | $95.00 | Per TB/Year | Year to Year |
| RDE Storage: General Performance | $25.00 | Per TB/Year | Year to Year |
*Update 10/2025: Additional GPU priority partitions cannot be allocated at this time as GPU investment has reached beyond the 50% threshold. If you require capacity beyond the general pool we are able to plan and work with your grant submissions to add additional capacity to Hellbender.
How it works:
There are two tiers of access available on Hellbender/RDE. What is available to all UM system research faculty/staff at no cost (General) and what is available beyond that (Investor).
- Free access (General) tier compute:
- Hellbender general account that gives access to run jobs on our 'General' queue as well as the 'Requeue' queue.
- When running on the 'General' partition - users jobs are queued according to their fairshare score. The maximum running time is 2 days.
- When running on the 'Requeue' partition - users jobs are subject to pre-emption if those jobs happen to land on an investor owned node. The maximum running time is 2 days.
- To get started please fill out our Hellbender Account Request Form
- Paid access (Investor) tier compute:
- Hellbender investor account that has first right to run on the node or set of nodes that they have leased.
- Can submit to any queue (however when using 'General' investors will still be subject to fairshare for scheduling priority on these 'General' resources). Max running time on their node(s) is 28 days.
- To invest please submit the following order form: CPU Node Order Form
- Free access (General) tier storage:
- All accounts are given 50GB of storage in /home/$USER as well as 500GB in /home/$USER/data at no cost.
- MU PI's are eligible for 1 free 5TB group storage in our RDE environment
- To get started please fill our our general Hellbender Account Request Form for a Hellbender account and our RDE Group Storage Request Form for the free 5TB group storage.
- Paid access (Investor) tier storage:
- RSS offers storage to purchase if you have needs beyond 5TB. We have two tiers of storage available:
- High Performance Storage - All flash disc - good for high I/O HPC workloads. Priced at $95/TB/Year.
- General Performance Storage - Mixed flash/spinning disc environment. Ideal for larger dataset storage/longer term storage. Priced at $25/TB/Year.
- To get started please fill out our RSS Storage Order Form
CPU Node Lease
CPU Nodes
Investments in CPU nodes are per node per year - however if you have funds available that you would like to pay for multiple years up front we can accommodate that. Once Hellbender has hit 50% of the total nodes in the cluster being investor-owned we will restrict additional leases until more nodes become available via either purchase or surrendered by other PI's. The CPU nodes available for investment comprise of the following:
| Model | # Nodes | Cores/Node | System Memory | Local Scratch | # Core | Node Names |
| Dell C6525 | 112 | 128 | 490 GB | 1.6 TB | 14336 | c001-c112 |
The 2026 pricing is: $2,702 per node per year.
GPU Node Lease
GPU Nodes
The investment structure for GPU nodes is the same as CPU - per node per year. f you have funds available that you would like to pay for multiple years up front we can accommodate that. Once Hellbender has hit 50% of the total GPU nodes in the cluster being investor-owned we will restrict additional leases until more nodes become available via either purchase or surrendered by other PI's. The GPU nodes available for investment comprise of the following:
| Model | # Nodes | Cores/Node | System Memory | GPU | GPU Memory | # GPU/Node | Local Scratch |
| Dell R740xa | 17 | 64 | 490 GB | A100 | 80 GB | 4 | 1.6 TB |
| Dell R740xa | 6 | 64 | 490 GB | H100 | 94 GB | 2 | 1.8 TB |
| Dell R760 | 6 | 64 | 490 GB | L40S | 45 GB | 2 | 3.5 TB |
- A100 Node: $7,691.30 Per Node/Year
- H100 Node: $13,123.00 Per Node/Year
- L40S Node: $4,785.00 Per Node/Year
Additional GPU priority partitions cannot be allocated at this time as GPU investment has reached beyond the 50% threshold. If you require capacity beyond the general pool we are able to plan and work with your grant submissions to add additional capacity to Hellbender
Storage: Research Data Ecosystem ('RDE')
Research Storage
The Research Data Ecosystem ('RDE') is comprised of 8.5PB connected high-performance storage. This is split between two vendors (VAST and Pixstor) with NFS/GPFS mounts to client servers or the Hellbender cluster.
- Storage lab allocations are protected by associated security groups applied to the share, with group member access administered by the assigned PI or appointed representative.
What is the Difference between High Performance and General Performance Storage?
On Pixstor, which is used for standard HPC allocations, general storage is pinned to the SAS disk pool while high performance allocations are pinned to all flash NVME pool. Meaning writes and recent reads will have lower latency with High performance allocations.
On VAST, which is used for non HPC and mixed HPC / SMB workloads, the disks are all flash but general storage allocations have a QOS policy attached that limits IOPS to prevent the share from the possibility of saturating the disk pool to the point where high-performance allocations are impacted. High Performance allocations may also have a QOS policy that allows for much higher IO and IOPS. RSS reserves the right to move general store allocations to lower tier storage in the future if facing capacity constraints.
Use Cases for General Storage
- Workloads that may require intensive computing but do not require sustained read and write IO with speeds in the multiple GB/s
- Workloads that utilize SMB shares ON VAST
- Workloads that require single server NFS mounts (VAST)
Use Cases for High Performance Storage
- Workloads that require sustained use of low latency read and write IO of multiple GB/s, generally generated from jobs utilizing multiple HPC nodes
- Workloads that require sustained use of low latency read and write IO with multiple GB/s, generally generated from jobs utilizing multiple NFS mounts
Snapshots
- VAST default policy retains 7 daily and 4 weekly snapshots for each share
- Pixstor default policy is 10 daily snapshots
None of the cluster attached storage available to users is backed up in any way by us, this means that if you delete something and don't have a copy somewhere else, it is gone. Please note the data stored on cluster attached storage is limited to Data Class 1 and 2 as defined by UM System DCL. If you have need to store things in DCL3 or DCL4 please contact us so we may find a solution for you.
The 2026 pricing is: General Storage: $25/TB/Year, High Performance Storage: $95/TB/Year
To order storage please fill out our RSS Services Order Form
Research Data Archive
Use Case
The ITRSS Tape Archive solution is to satisfy researchers retention requirements for data no longer actively in use following the end of a research effort or project. Once written to tape, the data can be recovered back to RDE storage, however such requests should be ad hoc or emergency requests rather than routine recovery for further processing.
It’s important to note this is a point in time archive rather than reoccurring backups.
Costs
The cost associated with using the RDE tape archive is $8/TB for short term data kept in inside the tape library for 1-3 years or $144 per tape rounded to the number of tapes for tapes sent offsite for long term retention up to 10 years. We send these tapes off to record management where they are stored in a climate-controlled environment. Each tape from the current generation LTO 9 holds approximately 18TB of data These are flat onetime costs, and you have the option to do both a short term in library copy, and a longer-term offsite copy, or one or the other, providing flexibility.
Request Process
To utilize the tape archive functionality that RSS has setup, the data to be archived will need to be copied to RDE storage if it does not exist there already. This would require the following steps.
- Submit a RDE storage request if the data resides locally and a RDE share is not already available to the researcher: RSS Group Storage Form
- Create an archive folder or folders in the relevant RDE storage share to hold the data you would like to archive. The folder(s) can be named to signify the contents, but we ask that the name includes _archive at the end. For example, something akin to: labname_projectx_archive_2024.
- Copy the contents to be archived to the newly created archive folder(s) within the RDE storage share.
- Submit a RDE tape Archive request: https://archiverequest.itrss.umsystem.edu
- Once the tape archive jobs are completed ITRSS will notify you and send you an Archive job report after which you can delete the contents of the archive folder.
- We request that subsequent archive jobs be added to a separate folder, or the initial folder renamed to something that signifies the time of archive for easier retrieval *_archive2024, *archive2025, etc.
Recovery
Once the data is written to tape it can be recovered if required, via a ticket submitted to itrss-support@umsystem.edu the turnaround will depend on if the data is offsite or within the library or stored with records management, and the amount of data that is requested to be restored.
It’s important to note this is a point in time archive rather than reoccurring backups.
System Information
Maintenance
Regular maintenance is scheduled for the 2nd Tuesday of every month. Jobs will run if scheduled to complete before the window begins, and jobs will start once maintenance is complete.
Getting Help
Office Hours
The RSS team offers weekly help sessions via our office hours zoom with our Cyberinfrastructure Engineers (CIE's).
The office hours are first come, first served with no appointment needed (however it is typically easier to first send us an e-mail to itrss-support@umsystem.edu outlining your issue).
Please note: Office hours are password protected - to get the password please send us a request at itrss-support@umsystem.edu
| Day | Time | Link |
| Monday | 2:00 P.M. - 4:00 P.M. | RSS Office Hours Link |
| Tuesday | 2:00 P.M. - 4:00 P.M. | RSS Office Hours Link |
| Wednesday | 10:00 A.M. - 12:00 P.M. | RSS Office Hours Link |
| Wednesday | 2:00 P.M. - 4:00 P.M. | RSS Office Hours Link |
| Thursday | 2:00 P.M. - 4:00 P.M. | RSS Office Hours Link |
Intro to Hellbender/HPC Canvas Course
Please review our self paced canvas course for an introduction to Hellbender and HPC concepts:
https://umsystem-self-enroll.catalog.instructure.com/courses/rss-intro-to-supercomputing
Links
Software
Hellbender was built and managed with Puppet. The underlying OS for the Hellbender is Alma 8.9. For resource management and scheduling we are using SLURM Workload manager version 22.05.11
Hardware
Management nodes
The head nodes and login nodes are virtual, making this one of the key differences from the previous cluster Lewis.
Compute nodes
Dell R6525: .5 unit server containing dual 64 core AMD EPYC Milan 7713 CPUs with a base clock of 2 GHz and a boost clock of up to 3.675 GHz. Each C6525 node contains 512 GB DDR4 system memory.
Dell R640: 1 unit server containing dual 20 core Intel Xeon Gold 6138 CPUs with a base clock of 2 GHz. Each R640 node contains 192 GB DDR4 system memory.
Dell C6420: .5 unit server containing dual 24 core Intel Xeon Gold 6252 CPUs with a base clock of 2.1 GHz. Each C6420 node contains 384 GB DDR4 system memory.
Dell R6625: 1 unit server containing dual 128 core AMD EPYC 9754 CPUs with a base clock of 2.25 GHz. Each R6625 node contains 1 TB DDR5 system memory.
Dell R6625: 1 unit server containing dual 128 core AMD EPYC 9754 CPUs with a base clock of 2.25 GHz. Each R6625 node contains 6 TB DDR5 system memory.
| Model | Nodes | Cores/Node | System Memory | CPU | Local Scratch | Cores | Node Names |
| Dell C6525 | 112 | 128 | 490 GB | AMD EPYC 7713 64-Core | 1.6 TB | 14336 | c001-c112 |
| Dell R640 | 32 | 40 | 364 GB | Intel(R) Xeon(R) Gold 6138 CPU @ 2.00GHz | 100 GB | 1280 | c113-c145 |
| Dell C6420 | 64 | 48 | 364 GB | Intel(R) Xeon(R) Gold 6252 CPU @ 2.10GHz | 1 TB | 3072 | c146-c209 |
| Dell R6625 | 12 | 256 | 994 GB | AMD EPYC 9754 128-Core Processor | 1.5 TB | 3072 | c210-c221 |
| Dell R6625 | 2 | 256 | 6034 GB | AMD EPYC 9754 128-Core Processor | 1.6 TB | 512 | c222-c223 |
| Total Cores | 22272 |
GPU nodes
| Model | Nodes | Cores/Node | System Memory | GPU | GPU Memory/GPU | GPUs/Node | Local Scratch | Cores | Node Names |
| Dell R750xa | 17 | 64 | 490 GB | A100 | 80 GB | 4 | 1.6 TB | 1088 | g001-g017 |
| Dell XE8640 | 2 | 104 | 2002 GB | H100 | 80 GB | 4 | 3.2 TB | 208 | g018-g019 |
| Dell XE9640 | 1 | 112 | 2002 GB | H100 | 80 GB | 8 | 3.2 TB | 112 | g020 |
| Dell R730 | 4 | 20 | 113 GB | V100 | 32 GB | 1 | 1.6 TB | 80 | g021-g024 |
| Dell R7525 | 1 | 96 | 490 GB | V100S | 32 GB | 3 | 480 GB | 96 | g025 |
| Dell R740xd | 2 | 40 | 364 GB | V100 | 32 GB | 3 | 240 GB | 80 | g026-g027 |
| Dell R740xd | 1 | 44 | 364 GB | V100 | 32 GB | 3 | 240 GB | 44 | g028 |
| Dell R760xa | 6 | 64 | 490 GB | H100 | 94 GB | 2 | 1.8 TB | 384 | g029-g034 |
| Dell R760 | 6 | 64 | 490 GB | L40S | 45 GB | 2 | 3.5 TB | 384 | g035-g040 |
| Dell XE9680 | 1 | 96 | 2048 GB | H200 | 141 GB | 8 | 28 TB | 96 | g041 |
| Total GPU | 132 | Total Cores | 2572 |
A specially formatted sinfo command can be ran on Hellbender to report live information about the nodes and the hardware/features they have.
sinfo -o "%5D %4c %8m %28f %35G"
Policies
Under no circumstances should your code be running on the login node.
Each user must use their own account to access RSS resources. Account sharing is prohibited.
Software and Procurement
Open Source Software installed cluster-wide must have an open source (https://opensource.org/licenses) license or be obtained utilizing the procurement process even if there is not a cost associated with it.
Licensed software (any software that requires a license or agreement to be accepted) must follow the procurement process to protect users, their research, and the University. Software must be cleared via the ITSRQ. For more information about this process please reach out to us!
For widely used software RSS can facilitate the sharing of license fees and/or may support the cost depending on the cost and situation. Otherwise, user are responsible for funding for fee licensed software and RSS can handle the procurement process. We require that if the license does not preclude it, and there are not node or other resource limits, that the software is make made available to all users on the cluster. All licensed software installed on the cluster is to be used following the license agreement. We will do our best to install and support a wide rage of scientific software as resources and circumstances dictate but in general we only support scientific software that will run on RHEL in a HPC cluster environment. RSS may not support software that is implicitly/explicitly deprecated by the community.
Containers, Singularity/Apptainer/Docker
A majority of scientific software and software libraries can be installed in users’ accounts or in group space. We also provide limited support for Singularity for advanced users who require more control over their computing environment. We cannot knowingly assist users to install software that may put them, the University, or their intellectual property at risk.
Storage
None of the cluster attached storage available to users is backed up in any way by us, this means that if you delete something and don't have a copy somewhere else, it is gone. Please note the data stored on cluster attached storage is limited to Data Class 1 and 2 as defined by UM System Data Classifications. If you have need to store things in DCL3 or DCL4 please contact us so we may find a solution for you.
| Storage Type | Location | Quota | Description |
| Home | /home/$USER | 50 GB | Available to all users |
| Pixstor | /home/$USER/data | 500 GB | Available to all users |
| Local Scratch | /local/scratch | 1.6-3.2 TB | Available to all users |
| Pixstor | /cluster/pixstor, /mnt/pixstor | Varies | For investment, cluster attached |
| Vast | /cluster/VAST | Varies | For investment, cluster/instrument attached |
Research Network
Research Network DNS: The domain name for the Research Network (RNet) is rnet.missouri.edu and is for research purposes only. All hosts on RNet will have a .rnet.missouri.edu domain. Subdomains and CNAMEs are not permitted. Reverse records will always point to a host in the .rnet.missouri.edu domain.
Partitions
To view partition limits, use scontrol show part partitionname.
| Default Time Limit | Maximum Time Limit | Description | |
|---|---|---|---|
| general | 1 hour | 2 days | For non-investors to run multi-node, multi-day jobs. |
| requeue | 10 minutes | 2 days | For non-investor jobs that have been requeued due to their landing on an investor-owned node. |
| gpu | 1 hour | 2 days | Acceptable use includes jobs that utilize a GPU for the majority of the run. Is composed of Nvidia A100 cards, 4 per node. |
| interactive | 1 hour | 4 hours | For short interactive testing, interactive debugging, and general interactive jobs. Use this for light testing as opposed to the login node. |
| logical_cpu | 1 hour | 2 days | For workloads that can make use of hyperthreaded hardware |
| priority partitions | 1 hour | 28 days | For investors |
Citation
We ask that when you cite any of the RSS clusters in a publication to send an email to muitrss@missouri.edu as well as share a copy of the publication with us. To cite the use of any of the RSS clusters in a publication please use: The computation for this work was performed on the high performance computing infrastructure operated by Research Support Solutions in the Division of IT at the University of Missouri, Columbia MO DOI:https://doi.org/10.32469/10355/97710
Quick Start
Logging In
SSH (Linux)
Open a terminal and type
ssh username@hellbender-login.rnet.missouri.edu
replacing username with your campus sso username, enter your sso password
Logging in places you onto the login node. Under no circumstances should you run your code on the login node.
If you are submitting a batch file, then your job will be redirected to a compute node to be computed.
However, if you are attempting use a GUI, ensure that you do not run your session on the login node (Example: username@hellbender-login-p1). Use an interactive session to be directed to a compute node to run your software.
salloc --time=1:00:00 --x11
Putty (Windows)
Open Putty and connect to hellbender-login.rnet.missouri.edu using your campus SSO.
Off Campus Logins
Our off campus logins use public key authentication only, password authentication is disabled for off campus users unless they are connected to the campus VPN. Please send your public key to itrss-support@umsystem.edu with the subject of “Hellbender Public Key Access”. After setting up your client to use your key, you still use the host hellbender-login.rnet.missouri.edu to connect, however now without need for using the VPN.

Browser
See https://docs.itrss.umsystem.edu/pub/hpc/hellbender#open_ondemand on how to access Hellbender via Open OnDemand.
Open OnDemand
- https://ondemand.rnet.missouri.edu - Hellbender Open OnDemand (Researcher)
- https://hb-classes.missouri.edu - Hellbender Classes Open OnDemand (Classes)
OnDemand provides an integrated, single access point for all of your HPC resources. The following apps are currently available on Hellbender's Open Ondemand.
- Jupyter Notebook
- RStudio Server
- Virtual Desktop
- VSCode

Within our OnDemand environment you can quickly spin up an interactive session and utilize various GUI applications directly on the HPC cluster. This make OnDemand an ideal environment for not only research - but also classroom instruction. If you have additional questions or are interested in hosting your course using OnDemand please reach out to us!
Note, if you are having difficulty connecting to the Open OnDemand site, getting errors with login, the following suggestions may resolve the issue:
- Try enabling 3rd party cookies on your browser.
- Use a different or a incognito/private browser to access the site.
- Clear the Open Ondemand cookie on your browser.
For guidance on clearing cookies or enabling third party cookies in Chrome, visit this documentation: https://support.google.com/chrome/answer/95647?sjid=16658025073096883370-NC
For guidance on clearing cookies in Firefox, visit this documentation: https://support.mozilla.org/en-US/kb/clear-cookies-and-site-data-firefox For guidance on enabling third party cookies in Firefox, visit this documentation: https://support.mozilla.org/en-US/kb/third-party-cookies-firefox-tracking-protection
For guidance on clearing cookies in Safari, visit this documentation: https://support.apple.com/guide/safari/manage-cookies-sfri11471/17.0/mac/14.0 For guidance on enabling cookies on Safari, visit this documentation: https://support.apple.com/guide/safari/enable-cookies-ibrw850f6c51/17.0/mac/14.0
Note that you will also receive an error if you are not in a group that is allowed to use a specific Open OnDemand instance (such as the one for classes).
SSH Keys
If you want to connect using SSH keys, either to avoid having to type in your password, or are wanting to connect from off campus without a VPN, you can add your SSH public key to Hellbender.
For Windows users, we recommend using MobaXterm https://mobaxterm.mobatek.net. Powershell, git bash, and putty are some other available options. Mac and Linux users can use the default terminal.
Generating an SSH Key
You can generate a new SSH key on your local machine. After you generate the key, you can add the public key to your account on Hellbender.
- Open terminal
- Paste the text below, replacing the email used in the example with your University email address.
ssh-keygen -t ed25519 -C "sso@example.com"
Note: If you are using a legacy system that doesn't support the Ed25519 algorithm, use:
ssh-keygen -t rsa -b 4096 -C "sso@example.com"
This creates a new SSH key, using the provided email as a label.
Generating public/private ALGORITHM key pair.
When you're prompted to “Enter a file in which to save the key”, you can press Enter to accept the default file location. Please note that if you created SSH keys previously, ssh-keygen may ask you to rewrite another key, in which case we recommend creating a custom-named SSH key. To do so, type the default file location and replace id_ALGORITHM with your custom key name.
# Windows
Enter file in which to save the key (/c/Users/USERNAME/.ssh/id_ALGORITHM):[Press enter]
# Mac
Enter a file in which to save the key (/Users/USERNAME/.ssh/id_ALGORITHM): [Press enter]
# Linux
Enter a file in which to save the key (/home/USERNAME/.ssh/id_ALGORITHM):[Press enter]
- At the prompt, type a secure passphrase.
Enter passphrase (empty for no passphrase): [Type a passphrase]
Enter same passphrase again: [Type passphrase again]
Adding your SSH key
You may add your own SSH public key to your Hellbender account. You can also send the key to itrss-support@umsystem.edu and we can add it to your Hellbender account.
- Copy the contents of your SSH public key, which is written to the file created in the Generating an SSH Key step.
# Windows
Your public key has been saved in /c/Users/USERNAME/.ssh/id_ALGORITHM.pub
# Mac
Your public key has been saved in /Users/USERNAME/.ssh/id_ALGORITHM.pub
# Linux
Your public key has been saved in /home/USERNAME/.ssh/id_ALGORITHM.pub
# Windows
- The id_ALGORITHM.pub file contents should look similar to the ones below.
# ed25519
ssh-ed25519 AAAAB3NzaC1yc2EAAAABIwAAAQEAklOUpkDHrfHY17SbrmTIpNLTGK9Tjom/BWDSUGP truman@example.com

# rsa
ssh-rsa AAAAB3NzaC1yc2EAAAABIwAAAQEAklOUpkDHrfHY17SbrmTIpNLTGK9Tjom/BWDSUGPl+nafzlHDTYW7hdI4yZ5ew18JH4JW9jbhUFrviQzM7xlELEVf4h9lFX5QVkbPppSwg0cda3Pbv7kOdJ/MTyBlWXFCR+HAo3FXRitBqxiX1nKhXpHAZsMciLq8V6RjsNAQwdsdMFvSlVK/7XAt3FaoJoAsncM1Q9x5+3V0Ww68/eIFmb1zuUFljQJKprrX88XypNDvjYNby6vw/Pb0rwert/EnmZ+AW4OZPnTPI89ZPmVMLuayrD2cE86Z/il8b+gw3r3+1nKatmIkjn2so1d01QraTlMqVSsbxNrRFi9wrf+M7Q== truman@example.com
- Add your public key to your account by appending it to your authorized_keys file on Hellbender
[sso@hellbender-login ~]$ vim /home/sso/.ssh/authorized_keys
- OR send us your public key.
Submitting a job
Using SLURM, you need to create a submission script to execute on the backend nodes, then use a command line utility to submit the script to the resource manager. See the file contents of a general submission script complete with comments.
Example Job Script
- batch.sub
#!/bin/bash
#SBATCH --job-name=Change_ME
#SBATCH --ntasks=1
#SBATCH --time=0-00:10:00
#SBATCH --mail-type=begin,end,fail,requeue
#SBATCH --export=all
#SBATCH --out=Hellbender-%j.out

# %j will substitute to the job's id
#now run your executables just like you would in a shell script, Slurm will set the working directory as the directory the job was submitted from.
#e.g. if you submitted from /home/username/softwaretesting your job would run in that directory.

#(executables) (options) (parameters)
echo "this is a general submission script"
echo "I've submitted my first batch job successfully"
Now you need to submit that batch file to the scheduler so that it will run when it is time.
sbatch batch.sub
You will see the output of sbatch after the job submission that will give you the job number, if you would like to monitor the status of your jobs you may do so with the squeue command. If you submit a job to the requeue partition you will receive a warning message like:
sbatch: Warning, you are submitting a job the to the requeue partition. There is a chance that your job
will be preempted by priority partition jobs and have to start over from the beginning.
Submitted batch job 167
Common SBATCH Directives
| Directive | Valid Values | Description |
| –job-name= | string value no spaces | Sets the job name to something more friendly, useful when examining the queue. |
| –ntasks= | integer value | Sets the requested CPUS for the job |
| –nodes= | integer value | Sets the number of nodes you wish to use, useful if you want all your tasks to land on one node. |
| –time= | D-HH:MM:SS, HH:MM:SS | Sets the allowed run time for the job, accepted formats are listed in the valid values column. |
| –mail-type= | begin,end,fail,requeue | Sets when you would like the scheduler to notify you about a job running. By default no email is sent |
| –mail-user= | email address | Sets the mailto address for this job |
| –export= | ALL,or specific variable names | By default Slurm exports the current environment variables so all loaded modules will be passed to the environment of the job |
| –mem= | integer value | Amount of memory in MB you would like the job to have access to, each queue has default memory per CPU values set so unless your executable runs out of memory you will likely not need to use this directive. |
| –mem-per-cpu= | integer | Amount of memory in MB you want per cpu, default values vary by queue but are typically 800MB. |
| –nice= | integer | Allows you to lower a jobs priority if you would like other jobs set to a higher priority in the queue, the higher the nice number the lower the priority. |
| –constraint= | please see sbatch man page for usage | Used only if you want to constrain your job to only run on resources with specific features, please see the next table for a list of valid features to request constraints on. |
| –gres= | name:count | Allows the user to reserve additional resources on the node, specifically for our cluster gpus. e.g. –gres=gpu:2 will reserve 2 gpus on a gpu enabled node |
| -p | partition_name | Not typically used, if not defined jobs get routed to the highest priority partition your user has permission to use. If you were wanting to specifically use a lower priority partition because of higher resource availability you may do so. |
Valid Constraints
| Feature | Description |
| intel | Node has intel CPUs |
| amd | Node has amd CPUs |
| EDR | Node has an EDR (100Gbit/sec) infiniband interconnect |
| gpu | Node has GPU acceleration capabilities |
| cpucodename* | Node is running the codename of cpu you desire e.g. rome |
Note if some combination of your constraints and requested resources is unfillable you will get a submission error when you attempt to submit your job.
Monitoring your jobs
 squeue -u username OR squeue --me
JOBID PARTITION     NAME     USER ST       TIME  NODES NODELIST(REASON)
  167   requeue fahgpu_v jonesjos  R       2:50      1 compute-41-01
Cancel your job
scancel - Command to cancel a job, user must own the job being cancelled or must be root.
scancel <jobnumber>
Viewing your results
Output from your submission will go into an output file in the submission directory, this will either be slurm-jobnumber.out or whatever you defined in your submission script. In our example script we set this to hellbender-jobnumber.out, this file is written asynchronously so it may take a bit after the job is complete for the file to show up if it is a very short job.
Moving Data
Use one of the following options to move data. Do not move data on the login node.
Globus
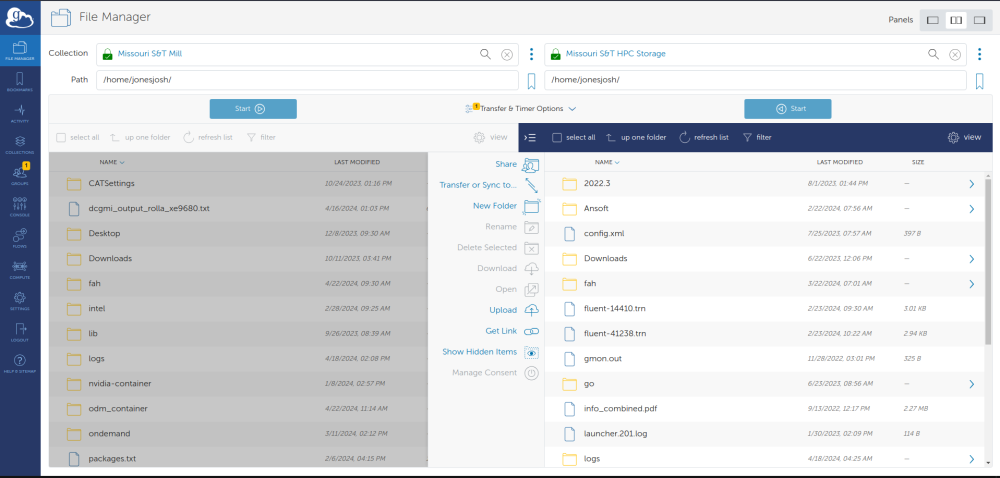
Globus can be used to move data to and from Hellbender. Use Globus by going to https://app.globus.org and logging in with your university account. If you want to migrate data from one collection to another, you will need to connect to both collections. Once you are connected to both collections you can drag and drop from one system to another and Globus will manage moving the data.
- Hellbender Collection Name: U MO ITRSS RDE
- Mill Collection Name: Missouri S&T Mill
More detailed information on how to use Globus is at https://docs.itrss.umsystem.edu/pub/hpc/hellbender#globus1
The screen will look something like this:
Data Transfer Node (DTN)
Hellbender has a node designed for high speed transfers. The node has a 100Gb/s link to the internet. The DTN is currently configured to accept SLURM jobs.
To use the DTN please login directly to the node: hellbender-dtn-p1 and initiate your rsync jobs:
ssh username@hellbender-dtn-p1.rnet.missouri.edu
Interactive Jobs
Some things can't be run with a batch script because they require user input, or you need to compile some large code and are worried about bogging down the login node. To start an interactive job simply use the salloc command and your terminal will now be running on one of the compute nodes. The hostname command can help you confirm you are no longer running on a login node. Now you may run your executable by hand without worrying about impacting other users. By default, salloc will use the partition's defaults, which for the interactive partition is 1 CPU, 800M Memory, for 1 hour.
Please note, the Interactive partition has a maximum time limit of 4 hours. Longer requests should be submitted to the scheduler.
Use the cluster interactively on the interactive partition:
[user@hellbender-login ~]$ salloc -p interactive
salloc: Pending job allocation 1902141
salloc: job 1902141 queued and waiting for resources
salloc: job 1902141 has been allocated resources
salloc: Granted job allocation 1902141
salloc: Waiting for resource configuration
salloc: Nodes c067 are ready for job
[user@c001 ~]$
Use the cluster interactively with more time and resources:
# -N number of nodes, -n number of cpus, -t time in hours:minutes:seconds
[user@hellbender-login ~]$ salloc -p interactive -N 2 -n 6 -t 4:00:00
Use a GPU interactively:
[user@hellbender-login ~]$ salloc -p requeue --gres=gpu:A100:1
salloc: Warning, you are submitting a job the to the requeue partition. There is a chance that your job will be preempted by priority partition jobs and have to start over from the beginning.
salloc: Pending job allocation 1902152
salloc: job 1902152 queued and waiting for resources
salloc: job 1902152 has been allocated resources
salloc: Granted job allocation 1902152
salloc: Waiting for resource configuration
salloc: Nodes g001 are ready for job
Teaching Cluster
Hellbender can be used by instructors, TAs, and students for instructional work via the Hellbender Classes Open OnDemand Classes portal (OOD).
Below is process for setting up a class on the OOD portal.
- Send the class name, the list of students and TAs, and any shared storage requirements to itrss-support@umsystem.edu. This can be also accomplished by filling out our course request form: * Hellbender: Course Request Form
- We will add the students to the group allowing them access to OOD.
- If the student does not have a Hellbender account yet, they will be presented with a link to a form to fill out requesting a Hellbender account.
- We activate the student account and the student will receive an Account Request Complete email.
If desired, the professor would be able to perform step 2 themselves. You may already be able to modify your class groups here: https://netgroups.apps.mst.edu/auth-cgi-bin/cgiwrap/netgroups/netmngt.pl
If the class size is large, we can perform steps 3 and 4.
Software
Anaconda
Anaconda is an open source package management system and environment management system. Conda quickly installs, runs and updates packages and their dependencies. Conda easily creates, saves, loads and switches between environments on your local computer. It was created for Python programs, but it can package and distribute software for any language.
Software URL:https://www.anaconda.org/
Documentation:https://conda.io/en/latest/
Recommended Configuration
By default, Conda stores environments and packages within the folder ~/.conda.
To avoid using up all of your home folder's quota, which can easily happen when using Conda, we recommend placing the following within the file ~/.condarc. You can create the file if it is not already present. You can also choose a different path, so long as it is not in your home folder.
envs_dirs:
- /mnt/pixstor/data/${USER}/miniconda/envs
pkgs_dirs:
- /mnt/pixstor/data/${USER}/miniconda/pkgs
Usage
The version of Anaconda we have available on Hellbender is called “Miniconda”. Miniconda is a version of Anaconda that only provides the conda command.
First, you will want to make sure that you are running in a compute job.
srun -p interactive --mem 8G --pty bash
Then, you need to load the miniconda3 module:
module load miniconda3
After that command completes, you will have the conda command available to you. conda is what you will use to manage your Anaconda environments. To list the Anaconda environments that are installed, run the following:
conda env list
If this is your first time running Anaconda, you will probably only see the “root” environment. This environment is shared between all users of Hellbender and cannot be modified. To create an Anaconda environment that you can modify, do this:
conda create --name my_environment python=3.7
You can use any name you want instead of my_environment. You can also choose other Python versions or add any other packages. Ideally, you should create one environment per project and include all the required packages when you create the environment.
After running the above command, you should see something like this:
The following NEW packages will be INSTALLED:

  _libgcc_mutex      pkgs/main/linux-64::_libgcc_mutex-0.1-main
  _openmp_mutex      pkgs/main/linux-64::_openmp_mutex-5.1-1_gnu
  ca-certificates    pkgs/main/linux-64::ca-certificates-2023.08.22-h06a4308_0
  certifi            pkgs/main/linux-64::certifi-2022.12.7-py37h06a4308_0
  ld_impl_linux-64   pkgs/main/linux-64::ld_impl_linux-64-2.38-h1181459_1
  libffi             pkgs/main/linux-64::libffi-3.4.4-h6a678d5_0
  libgcc-ng          pkgs/main/linux-64::libgcc-ng-11.2.0-h1234567_1
  libgomp            pkgs/main/linux-64::libgomp-11.2.0-h1234567_1
  libstdcxx-ng       pkgs/main/linux-64::libstdcxx-ng-11.2.0-h1234567_1
  ncurses            pkgs/main/linux-64::ncurses-6.4-h6a678d5_0
  openssl            pkgs/main/linux-64::openssl-1.1.1w-h7f8727e_0
  pip                pkgs/main/linux-64::pip-22.3.1-py37h06a4308_0
  python             pkgs/main/linux-64::python-3.7.16-h7a1cb2a_0
  readline           pkgs/main/linux-64::readline-8.2-h5eee18b_0
  setuptools         pkgs/main/linux-64::setuptools-65.6.3-py37h06a4308_0
  sqlite             pkgs/main/linux-64::sqlite-3.41.2-h5eee18b_0
  tk                 pkgs/main/linux-64::tk-8.6.12-h1ccaba5_0
  wheel              pkgs/main/linux-64::wheel-0.38.4-py37h06a4308_0
  xz                 pkgs/main/linux-64::xz-5.4.2-h5eee18b_0
  zlib               pkgs/main/linux-64::zlib-1.2.13-h5eee18b_0


Proceed ([y]/n)?
Press y to continue. Your packages should be downloaded. After the packages are downloaded, the following will be printed:
#
# To activate this environment, use:
# > source activate my_environment
#
# To deactivate an active environment, use:
# > source deactivate
#
Make a note of that because those commands are how to get in and out of the environment you just created. To test it out, run:
[bjmfg8@c067 ~]$ source activate my_environment
(my_environment) [bjmfg8@c067 ~]$ python
Python 3.7.16 (default, Jan 17 2023, 22:20:44)
[GCC 11.2.0] :: Anaconda, Inc. on linux
Type "help", "copyright", "credits" or "license" for more information.
>>>
You might notice that (my_environment) now appears before your prompt, and that the Python version is the one you specified above (in our example, version 3.7).
Press Ctrl-D to exit Python.
When the environment name appears before your prompt, you are able to install packages with conda. For instance, to install pandas:
(my_environment) [bjmfg8@c067 ~]$ conda install pandas
Now, pandas will be accessible from your environment:
(my_environment) [bjmfg8@c067 ~]$ python
Python 3.7.16 (default, Jan 17 2023, 22:20:44)
[GCC 11.2.0] :: Anaconda, Inc. on linux
Type "help", "copyright", "credits" or "license" for more information.
>>> import pandas
>>> pandas.__version__
'1.3.5'
Press Ctrl-D to exit Python. To see list of installed packages in the environment, run:
conda list
To exit your environment:
(my_environment) [bjmfg8@c067 ~]$ conda deactivate
[bjmfg8@c067 ~]$
In the case that you do not need your environment, you can use the following to remove it (after exit):
conda env remove --name my_environment
Conda Channels
Whenever we use conda create or conda install without mentioning a channel name, Conda package manager search its default channels to install the packages. If you are looking for specific packages that are not in the default channels you have to mention them by using:
conda create --name env_name --channel channel1 --channel channel2 ... package1 package2 ...
For example the following creates new_env and installs r-sf, shapely and bioconductor-biobase from r, conda-forge and bioconda channels:
conda create --name new_env --channel r --channel conda-forge --channel bioconda r-sf shapely bioconductor-biobase
Conda Packages
To find the required packages, we can visit anaconda.org and search for packages to find their full name and the corresponding channel. Another option is using conda search command. Note that we need to search the right channel to find pakages that are not in the default channels. For example:
conda search --channel bioconda biobase
(Desktop) Anaconda Virtual Environment on Windows w/o Admin Privileges
Please refer to the following document to install anaconda on Windows without admin rights: anaconda_as_user.pdf
(Desktop) Graphically Creating and Activating a Python Virtual Environment in Anaconda Navigator
Please refer to the following document to see how to create a python virtual environment in Anaconda navigator: graphic_commandline_create_activate_use.pdf
CUDA
CUDA® is a parallel computing platform and programming model invented by NVIDIA. It enables dramatic increases in computing performance by harnessing the power of the graphics processing unit (GPU). With millions of CUDA-enabled GPUs sold to date, software developers, scientists and researchers are using GPU-accelerated computing for broad-ranging applications.
Software URL:https://developer.nvidia.com/cuda-zone
Documentation:http://docs.nvidia.com/cuda/index.html
RStudio
Visual Studio Code
OpenOnDemand
Visual Studio Code, also commonly referred to as VS Code, is a source-code editor developed by Microsoft for Windows, Linux and macOS. Features include support for debugging, syntax highlighting, intelligent code completion, snippets, code refactoring, and embedded Git.
We require users who want to work with VS Code on Hellbender to only use our interactive application in Open On Demand. Native connections to VS Code will spawn resource intensive processes on the login node and your session will likely be terminated by a system administrator.
To open a VS Code session in Open On Demand navigate to https://ondemand.rnet.missouri.edu/ in a web browser.
You will see a landing page similar to this:

Next select “Interactive Apps” and choose VS Code Server:

You will see a menu to add resources to your job submission. VS Code should be fine with the defaults (this is just for running the VS Code editor - this is not the resource selections for the actual jobs you want to run).

Your job will be submitted to the queue, after a few seconds you should see the option to launch your VS Code window:

You should land in your /data directory by default. You can now use VS Code as you wish.
X Forwarding
Another way to use VS Code is by using X forwarding through the regular slurm scheduler. First you will want to connect to the Mill with X forwarding enabled.
ssh -X hellbender-login.rnet.missouri.edu
If you are using a Mac computer you should use
ssh -Y hellbender-login.rnet.missouri.edu
Also, if you are a Mac user you will need to install xquartz package first (https://www.xquartz.org/). Restart of your Mac might be required after you install the xquartz package.
Next, you will want to start an interactive session on the cluster.
salloc --x11 --time=1:00:00 --ntasks=2 --mem=2G --nodes=1
Once you get a job, you will want to load the VS Code module with:
module load vscode/1.88.1
To launch VS Code in this job you simply run the command:
code
Matlab
For running Matlab in OOD Virtual Desktop on a gpu, in the Virtual Desktop terminal, type.
export CUDA_VISIBLE_DEVICES="1"
module load matlab
matlab
Globus
Globus is a file transfer software ecosystem widely used in the science and research community. It offers the ability to transfer large amounts of data in parallel and over secure channels between various “endpoints.”
Endpoint
- An endpoint in Globus is a network location (like a server, a cluster, or a personal computer) that has been configured to use Globus services. It is an access point for data transfer, allowing users to move or share data between their endpoint and others.
- The Hellbender/RDE endpoint is: “U MO ITRSS RDE”.
- If you are trying to transfer files from your university OneDrive select “U MO ITRSS RDE - M365”
Data Transfer Node (DTN)
- A DTN is a high-performance server optimized for transferring large datasets. It can serve as an Endpoint, facilitating efficient data movement within the Globus network.
Globus Connect Personal
- GCP is a software application that allows a personal computer to be used as a Globus Endpoint, enabling secure and efficient data transfer to and from the computer using the Globus service. It's designed for use on non-server systems, such as desktops or laptops, for convenient access to the Globus network.
Collection
- A collection in Globus is a specific set of data within an endpoint. It's akin to a folder or directory on a storage system that has been shared or made accessible through Globus.Collections allow users to organize their data and control access to it. Users can define permissions for collections, determining who can view or transfer the data.
Guest Collection
- A Guest Collection is a shared data access point configured by an endpoint owner, allowing external users (guests) to access and transfer specific data or directories without needing full access to the endpoint. This feature enables controlled and secure data sharing with collaborators who do not have accounts on the host system.
Getting Started with Globus
https://docs.globus.org/how-to/get-started/
- Visit www.globus.org and click “Login” at the top of the page. On the Globus login page, choose University of Missouri System and select “continue“
- You’ll be redirected to UM’s login page. Use your UM system credentials to login:

Once you’ve logged in with your organization, Globus will ask if you’d like to link to an existing account.
- If this is your first time logging in to Globus, click “Continue.”
- If you’ve already used another account with Globus, you can choose “Link to an existing account.”
- You may be prompted to provide additional information such as your organization and whether or not Globus will be used for commercial purposes. Complete the form and click “Continue.”

Finally, you need to give Globus permission to use your identity to access information and perform actions (like file transfers) on your behalf.


Tutorial: Globus File Manager
After you’ve signed up and logged in to Globus, you’ll begin at the File Manager.
note: Symlinks may not be transferred via Globus, preview: https://docs.globus.org/faq/transfer-sharing/#how_does_globus_handle_symlinks If symlinks need to be copied, consider using the rsync on the DTN with with the -l flag
The first time you use the File Manager, all fields will be blank:

Key Concept: Collection
- A collection is a named location containing data you can access with Globus.
- Collections can be hosted on many different kinds of systems, including campus storage, HPC clusters, laptops, Amazon S3 buckets, Google Drive, and scientific instruments.
- When you use Globus, you don’t need to know a physical location or details about storage. You only need a collection name.
- A collection allows authorized Globus users to browse and transfer files.
- Collections can also be used for sharing data with others and for enabling discovery by other Globus users.
- Globus Connect is the application used to host collections.
Access A Collection
- Click in the Collection field at the top of the File Manager page and type “globus tutorial collection 1”.
- Globus will list collections with matching names. The collections Globus Tutorial Endpoint 1 and Globus Tutorial Endpoint 2 are collections administered by the Globus team for demonstration purposes and are accessible to all Globus users without further authentication.

- Click on Globus Tutorial Collection 1.
- Globus will connect to the collection and display the default directory, /~/. (It will be empty.) Click the “Path” field and change it to home/share/godata/. Globus will show the files in the new path: three small text files

Request A File Transfer
- Click Transfer or Sync to… in the command panel on the right side of the page.
- A new collection panel will open, with a “Transfer or Sync to” field at the top of the panel.
![]()
- Find the “Globus Tutorial Collection 2” collection and connect to it as you did with the Globus Tutorial Endpoint 1 above.
- The default directory, /~/ will again be empty. Your goal is to transfer the sample files here.
- Click on the left collection, Globus Tutorial Collection 1, and select all three files. The Start> button at the bottom of the panel will activate.

- Between the two Start buttons at the bottom of the page, the Transfer & Sync Options tab provides access to several options.
- By default, Globus verifies file integrity after transfer using checksums. Click the information icons for explanations of the other transfer settings.
- Globus gives you powerful control over the behavior of the transfer with a simple mouse click. Change the transfer settings if you’d like. You may also enter a label for the transfer, but this isn’t required.
- Click the Start> button to transfer the selected files to the collection in the right panel. Globus will display a green notification panel—confirming that the transfer request was submitted—and add a badge to the Activity item in the command menu on the left of the page.
![]()
Confirm Transfer Completion
- Only three small files were transferred in our simple example, so the transfer will complete quickly.
- Click Activity in the command menu on the left of the page to go to the Activity page.
- On the Activity page, click the arrow icon on the right to view details about the transfer. You will also receive an email with the transfer details.
![]()
Tutorial: Sharing Data - Create a Guest Collection
With Globus, you can easily share research data with your collaborators. You don’t need to create accounts on the server(s) where your data is stored. You can share data with anyone using their identity or their email address.
To share data, you’ll create a guest collection and grant your collaborators access as described in the instructions below. If you like, you can designate other Globus users as “access managers” for the guest collection, allowing them to grant or revoke access privileges for other Globus users.
*Note: A user cannot have more privileges than they have on the file system. For guest collections, a locally authorized user with read-only privileges can offer read-write access to a guest, but the guest will not get read-write access since the person granting them access did not have that access to share. (i.e. no privilege escalation above those of the person doing the invitation.)
Log into Globus and navigate to the File Manager
- Select the collection that has the files/folders you wish to share and, if necessary, activate the collection.
- Highlight the folder that you would like to share and Click Share in the right command pane. *Note: Sharing is available for folders. Individual files can only be shared by sharing the folder that contains them.

Provide a name for the guest collection and click “Add Guest Collection”. If this is the first time you are accessing the collection, you may need to authenticate and consent to allow Globus services to manage your collections on your behalf.


When your collection is created, you’ll be taken to the Sharing tab, where you can set permissions. As shown below, the starting permissions give read and write access (and the Administrator role) to the person who created the collection.

- Click the Add Permissions button or icon to share access with others.
- You can add permissions for an individual user, for a group or for all logged-in users.
- In the Identity/E-mail field, type a person’s name or username (if user is selected) or a group name (if group is selected) and press Enter.
- Globus will display matching identities. Pick from the list. If the user hasn’t used Globus before or you only have an email address, enter the email address and click Add.
- This example grants read access to Globus user wassmanr:

Moving Data From Lewis to Hellbender Using Globus
Both Lewis and Hellbender have Globus endpoints which allows for the easy transfer of data between the two clusters directly from the Globus application.
To begin, login to the Globus web client and follow the login prompts to connect to your account. In the file manager menu search for the Lewis endpoint “MU RCSS Lewis Home Directories”

This will land on your home file path (the same as where you land by default after logging into Lewis). From here you can select the file that you would like to transfer to Hellbender. In this case we will be moving the file “test.txt”.

Next, we need to find the Hellbender endpoint to transfer this file to. In the collection search bar on the right search for the Hellbender/RDE endpoint “U MO ITRSS RDE”. If you are trying to transfer files from your university OneDrive select “U MO ITRSS RDE - M365”. If you do not see the menu on the right - select the “transfer or sync to” option.

After “U MO ITRSS RDE” is selected:

You will land by default at the root directory of the RDE storage system. Use the path box to navigate to the specific file path on Hellbender/RDE that you are wanting to move the data to. NOTE: This works the same for group storage as well as the personal /data. In this example - we are using the personal data directory of user bjmfg8:

Once you have your desired file selected from the Lewis side and your destination selected on the Hellbender/RDE side you are ready to transfer the file. Select the “Start” button on the source (Lewis) side to begin:

![]()
You can refresh the folder and you should see the small test.txt file has been successfully transferred:
